Friday, April 22, 2011

The Mount

It clouded over in my yard, so I'm writing this instead of fiddling with my telescope. Aren't you lucky.

First, some background. As I mentioned before, the Mallincam is a device that is something of a hybrid. On the one hand it is a long exposure camera not completely unlike the CCD cameras that astrophotographers use to collect data over long hours. On the other hand, the Mallincam is a device that is meant to be used for visual observation. That is, it shows you your pictures as immediately as possible, rather than making you wait for a computer and Photoshop to chew on the RAW pixel data for a few hours. Still, the some of the magic of the camera is in the fact that the camera can take long exposures. And here is where our story starts.

You will recall that telescopes made up of an optical tube sitting on a mount. The mount keeps the telescope off the ground, facilitates aiming the telescope at what you want to look at, and also keeps the telescope reasonably still so that the image is stable and easy to look at. When you look through a telescope with your eyeball, this is about all you need. You point the telescope, look for a while, repoint the telescope as the object moves out of the frame, and then look some more. The object moves because the Earth rotates.

Many modern mounts have mechanisms to compensate for this. What you do is stick motors into the mount that slowly move the telescope in a direction which is exactly opposite to that of the Earth's rotation. Then whatever you put in the eyepiece will just sit there and let you stare at it as the motion of the telescope exactly compensates for the motion of the Earth.

Now, the mount I bought can perform this trick. It has two motors, one for the "altitude axis" (moves the scope up and down) and one for the "azimuth axis" (moves the scope left and right). By driving these motors just the right way, it can track an object pretty well for hours at a time. While this worked fairly well, there were a couple of small problems. The tripod was a bit shaky, especially when focussing the telescope at high power. Pointing at objects near zenith was always stressful because you are never sure if the telescope will clear the base. Finally, using the hand controller to move the mount in small motions could be frustrating sometimes. Because of the way the gears work, objects might not move even if you held the button down for a long time, and then they might leap off in random directions. You learned to cope with this.

When I hooked the camera up to the telescope, all of these small problems were amplified. In particular, the little mount with its motors and gears tracking the sky in two directions at once just was not precise enough. If you pushed the exposure past 15 or 20 seconds, instead of nice round stars you'd get little mini star trails, like this:


This just gets worse as you get into longer exposures. And it gets even worse near zenith. Finally, I had occasional problems with the mount just going nuts and driving off into never-never land. It would happen occasionally, but with no real pattern. Which was annoying.

So what is to be done? I never thought it would come to this, but what is to be done is to buy an equatorial mount. An equatorial mount has its axes tilted so that one can be perfectly aligned with the rotational axis of the Earth. In the northern hemisphere what this means is that you can take one of the axes and point it right at the north pole. Then you can compensate for the motion of the Earth by moving the telescope around a single axis. In theory this solve the jaggy tracking problem and as a bonus you also solve the field rotation problem. Here is a schematic diagram of the idea, along with pictures of a few styles of mount:


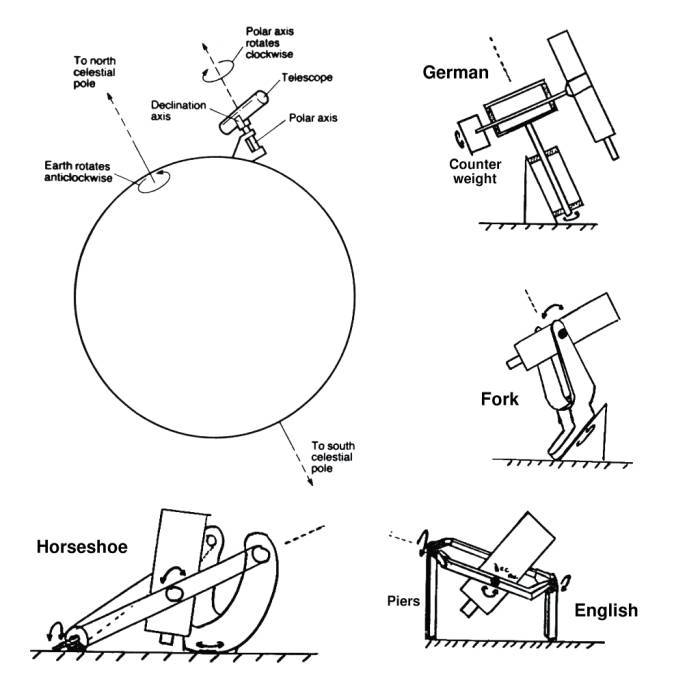
The axis of the mount that points at the pole is called the "polar" or "right ascension" axis. The axis that points north and south is called the "declination" axis. This is a reference to the celestial coordinate system which I won't get into here.

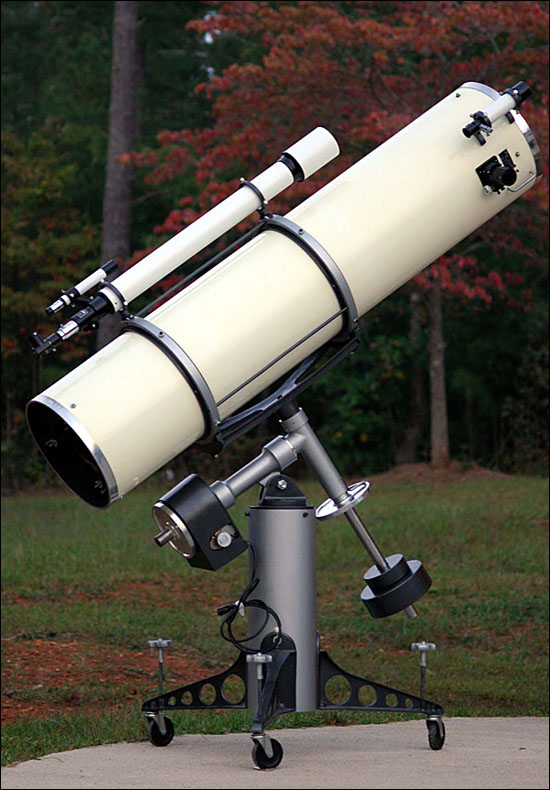
I have never liked the idea of equatorial mounts. When I think of EQ mounts, I think of huge Newtonian reflector tubes pointing off in all strange directions and the men in white coats from the Meade ads in the 1970s. Like this:


Equatorial mounts are also more complicated. There is the whole business of polar alignment. The descriptions of this technique on the Internet range from fairly casual to mind bendingly complicated. As we all know, the only thing I fear more than men in white coats is extra complexity.

After some thought and consideration, I decided that polar alignment didn't seem that much more complicated than the star alignment procedure that I was already performing with the little alt-az mount. So I examined the market for mounts in detail. The most popular sort of equatorial mount by far is the so called "German Equatorial Mount" or GEM for short. A GEM puts the telescope on top of the two axes of rotation, with a counterweight on the other side. Like the huge Newtonian in the picture above.

So, which GEM to buy, that's the real question. The answer, like all answers, depends on what you want to do with the thing. Mounts are easy to characterize based on three mechanical parameters:

1. How much does the mount weigh?

2. How much weight can the mount hold in a stable fashion?

3. How long and how smoothly does the mount track?

In the computer era though, there is a fourth consideration that throws things off:

4. How good is the software that comes with the mount?

In general you will find that in terms of mechanics you get what you pay for. There is a direct and linear relationship between how much money you spend and how well the mount will hold weight and smoothly track the sky with the least amount of fuss. When you spend more money you get more reliable machinery that is built to a higher standard of precision. Those gears in the motor drive will be asymptotically closer theoretical perfection. More importantly, by building in small numbers the premium manufacturers can maintain a tight hold on testing and quality control.

My main requirements in a mount are not all that stringent. The most important thing is that I be able to carry out into the yard relatively easily. I don't yet have my remote control telescope bunker so I need something portable. Beyond that, I have a pretty light telescope and I only need to track for short periods of time. I can also tolerate the occasional sloppy frame. I'll just wait for the video camera to capture the next one a minute or so later. No big loss. As far as I could see, the mount landscape breaks down like this:

1. Cheap, light, and mechanically barely acceptable, but great software: Celestron CG5. This mount is made in China. If you look it up in Goggle you will find reams of material about how to rebuild it to be better. But, the Celestron hand controller is excellent. More on this later.

2. Medium expensive, heavier, better mechanics, worse software: Orion Sirius, or its bigger brother the Orion Atlas. You can get the mechanics of the Atlas with the Celestron software by buying a Celestron CGEM. These mounts are actually made by the same Chinese company that now owns Celestron. Strangely, they have not unified their software platform. Also, these mounts weigh 30-40 pounds and are probably too heavy. iOptron also has a nice mount in this class. But it is fairly new, and you should never buy anything too new, especially where embedded software is involved.

3. Premium expensive artisanal American made: Losmandy. These mounts are well liked for their build quality and overall polish. But, the software is written by one guy in his garage in his spare time. Currently the entire line is crippled by the fact that the hardware that runs the current firmware platform is obsolete. So, the one guy has been frantically rebuilding the software platform in a grand version 2. But it won't be ready for months, maybe a year. So the result is that you can now spend $2500 to $4000 on a great mount, and then wait a year for the software you need to use it to come out of beta.

4. Mechanically perfect, will just work out of the box, costs as much as a small car: AstroPhysics Mach 1. These cost ten times as much as the Celestron. As a result, everything mechanical is just better. It's beautifully machined. It has easy to use knobs that are never sloppy. It's ergonomic. It holds as much as a CGEM (say) while weighing a lot less. The tracking is up to an order of magnitude better. But the software is somewhat worse. In particular, the pointing and alignment code seems distinctly primitive compared to what Celestron does with their ten cent 16-bit embedded hand controller. This is sort of astounding when you think about it.

You can get other exotic mounts in the AstroPhysics price range from places like Paramount, Takahashi, and others. Those are mostly large mounts for permanent obervatories. Takahashi does make a smaller mount that only costs as much as a used car, but it requires a laptop for automatic pointing. I also forgot to mention the various Vixen mounts. But they use a freaky mini-laptop for a hand controller that seems to get mixed reviews.

What's clearly going on here is that mounts have changed from being something that was predominantly mechanical to something that is a mix of gears, motors and software. But, the people who make mounts have a background primarily in mechanical engineering, not software. It boggles my mind that we can't get an Astrophysics mount that runs the Celestron software. Because that would rule.

So since I didn't want to blow the entire college fund on a mount, I got the lightest one with the best software. I only need the mount to hold my relatively light telescope and track for relatively short periods of time (1 minute, maybe two on the outside). And, my tracking requirements are not that stringent. The Mallincam is not a high resolution device, so if I get a few fat stars on the TV screen I won't mind much.

I came close to getting the Sirius because I had seen it track very well with a load much larger than mine. But I ultimately didn't because I wanted to stick with the Celestron software. It's more important to me that the software in the hand controller be able to build a good pointing model with a minimum of fuss, and the Celestron stuff has proven that it can do so. Even better, the Celestron software can even help you polar align the mount by looking through the telescope rather than some crappy polar scope sitting in the RA axis. Every mount should be able to align itself this way. I don't want to spend my nights trying to find polaris while on my hands and knees on the driveway.

After all that overthinking, I got the CG-5 from B&H on a sunny Friday:

Under a full moon on a clear Friday night, I set it up and got everything aligned in about 15 minutes. That process goes like this:

1. Put the mount outside and hook it up to the battery. Point the RA axis roughly towards the north and set the latitude to roughly the altitude of Polaris. Don't sweat this. Then turn the telescope so it is also pointed north, parallel to the RA axis.

2. Put in time and location info.

3. Start the star align. The telescope will suggest stars and actually move to the first one by itself! This is an improvement over the SE mount, where you had to point at the first star by yourself.

4. Center the first star in your eyepiece. Hit Enter then Align.

5. Repeat three or four times. Now the telescope can point at almost anything accurately.

6. Now hit "Polar Align" on the hand control. The telescope will point back at the last star you aligned on. It will think for a bit and then point to the spot in the sky that the star would be if the mount were correctly polar aligned. At this point you use the knobs on the mount head to move it in altitude and azimuth until you have recentered the star in your eyepiece. This is the most painful part of the process because the knobs on the CG-5 are not great. The altitude knobs in particular are awful. The only way to adjust the altitude down is to back out the front knob and let the mount fall down. Really, I'm not kidding. The knobs on the AstroPhysics would be ten times better.

7. When you are done with the knob dance, hit Align. You are now decently polar aligned, and you didn't even have to crawl under the telescope to try and look through a crappy polar axis finder. At this point you may need to redo some of the pointing alignment (steps 3-5). But I didn't have to my first time out.

It took a little while to figure out the mechanical controls to get the mount polar aligned. But it wasn't too bad. The Celestron polar alignment scheme is really nice IMHO. I think it should be required by law in all computer controlled EQ mounts. It's also nice to have the scope track while you center alignment stars. This will make it possible, I think, to do alignments with the video camera already in the telescope. Finally, damned if the thing didn't track smoothly enough for about a minute when I was all done.

I guess I don't need to fear the complexity of the GEM, or those guys in the white coats any more. Maybe in a few years I'll blow the college fund to get perfect tracking for five minutes at a time.

Monday, April 4, 2011

A Mallincam Tutorial

I recently chronicled, in horrific detail, the steps I took to gently re-enter the world of astronomical observation. At the end of the episode, our dorky hero had become proficient with the modern telescope and its associated tools. Having gained this comfort with the tools, I took the next step and ordered my camera.

Having received the camera and used it for a while, I thought I'd try to fill a small hole in the Mallincam literature: the lack of a comprehensive tutorial. So here I've tried to tie together a lot of the disparate reference material and user manuals come with the camera and which are also on on the Internet in various forms. To do this I've drawn on the knowledge and experience of many people, especially all the guys (Rock, Don, Chris, Jim and all the others) at the Night Skies Network. I got the idea to write this after Don did an impromptu video presentation of this material one night on the web site.

So first we should review exactly what a Mallincam is. We should do this because the web sites that sell it, while enthusiastic, are not altogether clear about exactly what the device does, and how it is different from other imaging systems.

The Big Picture


Back in the old days, if you wanted to see more than was possible with just your eyeball and a telescope, you could attach a camera to the scope and take tediously long exposures on photographic plates or small pieces of film. Film, sadly, has limited sensitivity, which meant that if you wanted to pursue this line of work, you were often doomed to sit in the cold for hours gently babysitting your telescope as it erratically tracked the heavens.

When semiconductors and computers came along, astrophotographers were freed to capture light onto much more sensitive CCDs and also to use a computer to gently babysit the motion of the telescope. Still, since they are an odd bunch, the imagers were still happy enough to sit by their machines for the same long hours collecting data, and creating ever more fantastic pictures on their computers after the fact.

What was missing was a way to see more without all those hours of work. This is where the Mallincam and cameras like it come in. The Mallincam is an extremely sensitive CCD video camera that can also take relatively long exposures of deep sky objects. Its hybrid of CCD imaging hardware combined with real time video output lets you take time exposures without all the bother of digital image processing. The camera does that work for you so you can look at the object in the telescope.

Here is how it works: you attach it to your telescope on one end and a TV on the other. You tell the camera to expose for some number of seconds (mine can go from three seconds to about two minutes). Then, after each exposure period, a picture of what the telescope is pointing at appears on the screen. This picture stays on the screen until the next exposure, or integration is complete, at which time the screen refreshes and you get another image. And so it goes.

You don't need a computer. You don't need any image processing software. With 15 to 20 second exposures you can see more than you ever would in an eyepiece, and yet the whole experience is fairly close to real time. It's important to emphasize that this represents a rather novel new way of working in astronomical observation. It's similar to visual observation in you generally work in almost real time. But, it's also similar to digital imaging since the camera can capture so much more than you can see, especially under suburban skies. I think it is this hybrid nature that makes the Mallincam (and the similar Stellacam, described here) such an exiciting new class of astronomical devices.

Anyway, let's walk through how it works. What I'm going to describe below is the basic usage of the Mallincam VSS+ camera. Rock Mallin actually makes four different models of video cameras. There is the Junior, the Hyper Plus, the VSS+ and the new Xtreme. You can check out his web site to work out the differences between all the models.

This tutorial also concentrates on the direct on-camera control interface. I prefer to control the camera directly rather than use the Windows software to do it. Using this information it should not be hard for one to figure out what the same settings mean in the control software. Also, the VSS+ is similar but not identical to the newer Mallincam Xtreme. I'll point out some differences at the end.

Focal Length and Image Size


Before we get into how the camera works we have to deal with the issue of image size. The sensor in the Mallincam is pretty small. It's a so called "1/2" size CCD. No one really knows what this means, except to say that the chip is small. 8 inch Celestron telescopes have a pretty long focal length, and if you just stick the tiny CCD at the end of the tube, it is not going to see much of the sky at all.

Luckily there is an optical trick we can play. If we stick an extra lens, or lenses in front of the camera that focuses the cone of light coming from the telescope more quickly, then we can reduce the effective focal length of the telescope. This has two effects. First, it makes the tiny chip cover more sky. Second, it allows us to take shorter exposures, since the rule we learned from camera exposure still applies here. A shorter focal length means a smaller "f-ratio", which means faster pictures. There are various devices that can be used to perform this magic. Rock Mallin makes two reducers specifically designed for his cameras: the MFR-3 for Newtonians and the MFR-5 for SCTs. I picked up an MFR-5 and use it in a configuration that reduces the focal ratio of my telescope from around F10 to around F4. This turns out to be a pretty good general purpose image scale. Most objects are neither too large to fit nor too small to be seen at all.

We could actually spend an entire article discussing nothing but the mechanics of focal reducers. But I'm going to leave the rest of the details alone for now.

Camera Basics


Now we are set to figure out exactly how to use the camera you just bought. The camera comes with a short manual with tiny screen shots describing various menu systems containing many strange words in all-caps.


Alternatively, you can use a custom piece of .NET software to set most of these same parameters (still named in all-caps).


Luckily, the relative obscurity of these three letter acronyms covers up what is a fundamentally simple mechanism. There are four basic parts to the Mallincam engine.

1. The exposure engine. The good news is that the camera can take exposures from 1/12000th of a second to several minutes. The bad news is that there are three menus that you have to navigate to make it happen. I will discuss these menus below. The relevant acronyms are ALC/ELC, SENSE and SYNC.

2. Amplifier Gain. This is called AGC.

3. Other image processing parameters like white balance, gamma, and something akin sharpening (APC).

4. Cooling. Cooling is controlled using the MOTION DETECT menu. Even though it has nothing to do with motion detection.

Exposure


Probably the most confusing and somewhat byzantine aspect of the camera is how the exposure systems are interlocked. There are, sort of, three exposure systems in the camera, and three menus to control them.

Recall how the main menu of the camera looks:


The SYNC setting determines whether you are in (essentially) in short exposure mode or long exposure mode. The short exposure mode is for integrations up to 2.1 seconds. To set this you set your SYNC to VBS:


Now you can set the exposure time two ways. The ALC/ELC menu is for setting the shortest exposure times. If you are going to use the camera for very bright objects like the moon or planets this is what you use. To use ALC, you use the little buttons on the camera (or the auxilliary control box, I'm not a masochist) until the arrow points to the "ALC/ELC" menu:


Then you hit the center button to get into the settings screen. Here I have the shutter off:


And here I have the shutter speed at 1/1000th of a second:


In addition, you set the SENSE menu to OFF. We'll talk about the SENSE menu later:


Shutter speeds range from 1/100th to 1/12000th of a second. In earlier cameras, the level bar also affected the exposure of the final image, but I don't think that setting has any effect in the VSS+. I don't use the ELC mode at all, so I'm not going to tell you how it works here.

If you set the ALC shutter to OFF you enable the use of the SENSE menu to set longer exposures of up to 2.1 seconds. In this mode, the final video frame is generated by integrating multiple frames together. The exposure time is expressed as an even multiplier whose value is between is between 2x and 128x. Here we have it set to 32x:


and 128x:


At 128x, or 2.1 seconds, you have enough exposure to see most of the stars you would see in an eyepiece and some of the brighter deep sky objects.

Finally, the SYNC setting controls whether you use the extended exposure engine, which is also called "Hyper" mode.

You turn on hyper mode by doing three things:

Turn off the ALC exposure mode:


Set SENSE UP to 128x:


And then set the SYNC to INT:


At this point, the exposure that the camera uses is controlled by the little knob on the side. Every time a new frame is ready, a yellow light on the back of the camera will blink. You can use this light to figure out what your exposure is. When you turn the knob all the way counter-clockwise and you get a 3 second exposure. Turn it all the way clockwise and you get 56 seconds.

Finally finally, if you set SYNC to LINE, the exposure set by the knob is doubled:


Isn't that simple? Having covered how the engine works, the instructions that come with the camera now make more sense. For example, there is the sheet that tells you to set the menus this way when you turn the camera on at the start of the night to set up:

SENSE = 128x
ALC = OFF
SYNC = VBS

What this means is "take quick 2.1 second exposures", which is exactly what you want for initially setting up and aligning your telescope.

Meanwhile, for lunar and planetary work, the cookbook settings are

SENSE OFF
ALC = 1/100th to 1/12000th (probably around 1/1000th).
SYNC = VBS

This sets the camera up to fast exposures on bright objects.

Finally, for bread and butter deep sky work, you set the camera up like this:

SENSE = 128x
ALC = OFF
SYNC = INT

Then the knob controls the longer exposure times for dim objects.

In practice, I hardly ever take the camera out of "deep sky" mode. I just turn the knob all the way back and flip the SYNC back to VBS when I shut down for the night so I have fast exposures for setting up the telescope the next time out. So, before I shut the camera off I make sure the main menu screen looks like this:


And then I shut everything down and pack up for the night.

Gain (AGC)


With exposure out of the way, the next thing to talk about is gain, or AGC. Setting the AGC tells the camera how much amplifier gain you would like it too apply to the signal coming out of the CCD. It's similar to cranking up the ISO setting on your digital camera. To get the AGC you navigate the main menu to the AGC setting and use the buttons to set it to manual:


Then you can use the secondary menu to set the gain level:


There are two rules for setting AGC:

1. Set it as low as you can. Lower AGC will give you cleaner pictures at the expense of a longer exposure time. Higher AGC will let you use shorter exposures at the expense of more noise. Where you set this depends on how well your telescope can track and how long you want to wait for new pictures. I generally just put it close to the middle except for short exposure work, where you just turn it off.

2. You cannot reset the AGC while Hyper mode is on and the camera is going an extended exposure. You must flip SYNC back to VBS, set your new gain level and then re-enable the Hyper mode. If you don't do this, the camera can get into any number of odd states, at which time you reboot it.

Other Image Parameters


When using the Mallincam, you use exposure and gain to set a baseline for your image. But, the camera also gives you a few other settings to fine tune color balance, sharpness and gamma.

Color balance is controlled with the "W/B" menu. This menu has two automatic states and one manual. The automatic states are called ATW:


and AWC:


I'm not sure what the origin of these terms is. The manual state allows you to open up this menu where you can set your own red/blue sliders:


This menu also lets you set what I guess is tungsten (3200K) or daylight (5600K) preset white balances.

The Mallincam also has a setting called APC that lets you manipulate sharpness and the rendering of fine detail. You get to the APC menu through the options screen. First navigate to the OPTION menu and hit the center button to see this:


Then go to the last entry, and hit the right button so it says NEXT:


Then hit the center button to enter the magic second options menu:


Finally you can set the APC parameters in the APC menu off of this second options menu:


Pushing these sliders to the right increases the effect of the APC. To me, the effect is much like unsharp masking. Don't use too much of this because it can make the image look strange and noisy.

The option menu contains several other functions that I am not going to cover here. I will note though that you might have reason to mess with the GAMMA setting. Generally for deep sky stuff you set this to 1.0 to get the darkest backgrounds. But, there is a second setting if you need a lighter picture for some reason.

Cooling


The final camera parameter that you might want to manipulate is the one that controls the cooling system. The Mallincam uses an adaptive cooler that has two parameters: how aggressively to cool the CCD and how often to check and see whether the sensor needs to be cooled. Curiously, you set these parameters from the MOTION DETECT menu even though it's not clear what this has to do with motion detection. This menu looks like this:


The slider controls the level of cooling. The right side of the slider represents minimal cooling. As you push the slider left the cooling gets more aggressive. The timer controls how much the cooler runs. The timer has three setings: 10 seconds, 30 seconds and 60 seconds. Rock recommends that when you first turn the camera on, you set the time to 60 seconds and the level all the way right. This is a gentle level of cooling. As you use the camera more, you can set the timer to 30 or 10 seconds and the level further to the left.

If you turn MOTION DETECT off altogether from the main menu then the cooler runs all the time. I gather that you should be careful about doing this, but I don't understand the hardware well enough to know why.

Using the Mallincam Software


I have not personally used this control program, but others have. It has some convenient presets that set the camera up for planetary or deep sky. The meat of the program is the main settings screen though, which looks like this:


All of the various sections of this form should look familiar to you now. They set most of the same things as the camera menus did above. But, if you have a computer you can do it without needing to navigate the menus on the camera. The one thing you can't use this interface to use is to set exposure. For this you still have to use the knob on the VSS+ because it's the only thing that is hooked up to the exposure system

There is also a new control program for the Mallincam Xtreme. In addition to the regular settings it can also be used to set exposure directly.

You can find more information about this software in this article by Jack Huerkamp. In addition, you should also read this excellent review by Jim Welisek and also this other excellent review of the Xtreme which is also by Jim.

Putting it all Together


Now we're ready to take the camera outside. I have the following routine:

1. Set up and align the telescope as before with an actual eyepiece. I just find it easier to do it this way. My telescope does not track before it is aligned, and keeping everything centered in the camera while staring that the TV or computer screen was too nerve racking.

2. Replace the eyepiece with the camera. Hook up the power to the camera and hook up the video cable to the camera and whatever TV or computer is going to capture the image. If you are using a computer to capture the images, you'll need extra hardware to convert the analog video to digital frames. I'll cover that in the next article.

3. Focus. I have not talked about focus, but it's pretty easy. First, buy a Bahtinov mask and read a web page on how to use it. Put the mask on your telescope. Put the camera into the 2.1 second exposure mode and turn the focus dial until the diffraction pattern on the screen looks right.

If you don't have the mask, focus on a bright star or better yet, a bright cluster of stars. As you come towards best focus you'll notice dimmer stars will being to appear in the field. A good indication that you are close to focus is when no more dim stars appear, but none disappear either.

4. Point the telescope at something interesting. Right now The Orion Nebula is still conveniently visible. The screen will show you if the telescope pointed well. Use the hand controller to center it, then put the camera into Hyper mode. Remember the SYNC setting:


Wait 5 seconds. You will then see more on the screen. Turn the exposure knob clockwise a bit. With a 10 second exposure in my 8 inch SCT, I got this:


I have to say that this made learning the odd interface worth it.

Next time: All the other little details, and how to spend the rest of your yearly income to defeat periodic error.

Appendix and References


Most of the material presented here was inspired by a short tutorial session that happened on one of the NSN broadcasts one night. After watching that I figured it would be fun and useful to record the most important classes of menus settings that you can make on the camera.

As I said above, my camera is the Mallincam VSS+. It is slightly different than the earlier MCHP (Hyper Plus) model and the newer Xtreme model, but the main differences are in how you set exposure in Hyper mode. For the MCHP, all the camera menus are the same except for the cooler, and you set exposure (and cooling) using switches on the body of the camera. For the Xtreme, all the camera menus are the same except the VBS SYNC mode is never used and you set exposure using either the Windows software that is specific to the Xtreme or using a wireless remote control.

Much of what I covered on this page is also covered in one place or another in the various documents that you can download from Jack Huerkamp's web site. Jack is US distributor of the Mallincam, so if you are buying a camera in the states you'll be dealing with him.

I also recomment looking at the reviews of the VSS+ and the Xtreme on Cloudy Nights.

Finally, the Mallincam Yahoo group has a lot of useful reference information as well.