I haven't written anything down lately because I've spent the last couple of months working out various details in my workflow for taking pictures of tiny dim objects trillions of miles away from the Earth. Astrophotography is perhaps the most purely technical of all of the possible photographic disciplines. Everywhere you turn you are up against a lot of problems.
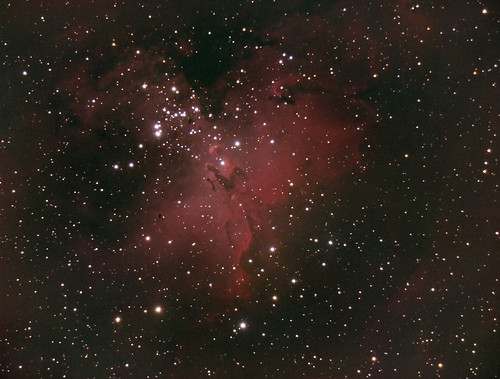
The first thing we learned on this web site is that a really good equatorial mount solves a huge number of problems. The mount will point your telescope with ease and precision, so you don't have to worry about hunting around in the sky for really small things. It will also track objects in the sky with great accuracy, so you can use a relatively simple camera and still take pictures of reasonable quality even at fairly long exposure times. You can do pretty well with this fairly simple setup, and even get some pictures that look pretty impressive. Like this:

This picture is hiding a lot of problems though. I've hidden them from you by burying them in the blacks. But in doing that I've also buried some of the detail. If you pull up the detail you can see what I mean:

Here we can see some of the same issues that I discussed in part 1. I've used the healing brush to substitute for flat frames, and it only sort of works. I've hidden a lot of background noise by burying the low values. And you can also see that as good as the mount is, at more than two minutes of exposure the stars are sort of oval shaped instead of nice and sharp.
After a few months of learning with the simple camera I decided to upgrade my goals. I wanted to be able to take longer exposures and I wanted to fine-tune my pre-processing.
For long exposures, I realized that I would finally have to come to terms with guiding. For pre-processing I decided I needed a more streamlined tool and also that I really needed to shoot flat frames which I had until now ignored. Flats are their own unique adventure, so let's cover guiding first.
Guiding is the act of correcting the tracking of the mount over time to compensate for unavoidable but (hopefully) small errors in the mechanics of the gear/motor train. First you point the camera at the object you want to take a picture of. Then you point a second optic at a star nearby and you keep that star in the exactly the same relative position to the target for however long you want to run the exposure. The key word here is exactly.
In the past the poor astrophotographer would have to sit out with his telescope staring into an eyepiece. If the guide star moved he would nudge the telescope this way and that to re-center it. These days we have computers to do this for us. So, you set up a second camera, point it at the guide star and run some software that repeatedly takes a picture of the star and makes sure that it sits in place. The software computes the star's position based on a short exposure image and then nudges the mount for you while you sit in your house and watch NFL football. How great is that?
The big choice you have in setting up a guider is to decide whether or not the guide camera will use the same optics as the main camera or not. Separate guide scopes are convenient because they provide a large field of view from which to choose a guide star. However, they can suffer from a wide range of problems that all boil down to this: if you use a second telescope to guide, the second telescope may move or not move in exactly the same way as the optics of the main telescope. When this happens the relative position of the guide star and the target will no longer be fixed and you will accumulate tracking errors. These errors may be too small to be noticeable, but if they are not they may prove to be very hard to find and remove.
To avoid problems with "differential flex" you can set up your guide camera to use the same optical path as your main camera. What you do is attach an "off axis guider" to the system. This device as a small prism in it that deflects a bit of the light coming to the main camera and shunts it to the guider, which sits off to the side. Assuming you can get a good star into this smaller off axis field of view you can then guide the main telescope without worrying about flex. The inconvenience is that you might not be able to find such a star and then you have to nudge the telescope or guide camera around until you find one. The other annoyance with these systems is that you have to make sure that the guider sits at exactly the same distance from the focal plane as the main camera. This can be tedious to set up, but you only have to do it once.
For the truly lazy the SBIG camera company developed a unique device in the early 90s. The SBIG camera uses two sensors to essentially incorporate an off-axis guider into the body of the main camera. The result is a single camera body with two sensors in it, one for imaging and one for guiding:

The light path from the telescope comes hits both chips at once without the need for a pickoff prism. In addition, both chips are automatically in focus at the same time. Thus, to guide, you point the camera to place the target on the main CCD and a guide star on the guiding CCD and start up the guiding software. Done and done.
The SBIG "self guided" cameras suffer from some of the same inconveniences as off-axis guiders. The field of the guide CCD is pretty small and sometimes you have to move the main camera a lot to get a good star. In addition, if you shoot through filters the filters sit in front of the guider which means that you have less light to guide with. This is especially difficult with filters that cut off most of the visible light coming from the sky (like H-alpha filters).
By now you know that I would not have spent all those words telling you how the camera worked if I hadn't decided to pick one up. SBIG has sold tons of these over the years, so they are easy to find used at good prices. So I found a nice ST-2000XM monochrome camera and got it set up.
At this point the main issue was software. I'd have liked to be able to use a piece of software called PhD for doing the guiding. This package is developed by the same guy who built Nebulosity, which I had been using for capture and pre-processing. Nebulosity is fairly robust and competent, so I'd have liked to stick with it. But, you can use Nebulosity and PhD with a single camera at the same time because the device only shows up on the USB bus once. Therefore, you have to find a program that can talk to both CCDs at once.
On the Mac there is only one such program and it's called Equinox Image. This is the companion to the Equinox planetarium program, and it's pretty good. I used "EI" to take learn the ins and outs of the camera. As promised, setting up the guider was straightforward and in no time I could take three to five minute exposures with perfect tracking every time:
The combination of the mount and guider is so smooth that you can't even see the image shift at all over a sequence of ten or fifteen frames. Truly amazing.
While Equinox Image was mostly satisfactory, I eventually started looking for something else for two reasons:
1. For whatever reason the native USB stack on the Mac is not super reliable. Or maybe the SBIG USB drivers are not great. In any case, my laptop would regularly lose contact with the camera requiring a restart of everything. Which was annoying.
2. After getting everything set up I found that Nebulosity's workflow for processing multiple sets of images with dark, bias and flat frames to be tedious and repetitive.
So I ended up downloading the demo to Maxim DL, which is the grand poo-bah of imaging software under Windows. Maxim is an old-school Windows-95 style application in the truest sense of phrase "old-school Windows-95 style application." The user interface is a mess of tabs inside windows inside windows that hide popup menus inside menus. But it does two things super well.
1. It has a streamlined engine for image pre-processing and stacking. You set it up once and hit one button and it goes. This is great.
2. It has a super plate solving utility that can figure out where your mount is pointed and automatically center things for you. This is great if you want to take pictures of the same target over multiple nights.
Maxim also has some nice utilities for taking a long series of pictures with multiple (RGB) filters. This makes it possible to set up a "run" for the night and then go inside and watch more NFL football. There are even people that do completely automatic capture with Maxim and a scripting program. In fact, automatic astrophotography may be the one place where people actually have taken effective advantage of COM scripting for something besides enterprise IT business logic.
Finally, for whatever reason, the USB communications between the camera and my VMWare virtual machine was rock solid. Much better than the native interface in MacOS. Go figure. After a few runs with Maxim I was hooked.
Next time I'll outline my current workflow with Maxim, describe my flat field adventures, and start a fun long term project involving objects that no one has any right to be able to take pictures of from a back yard. Good times.