One key to enjoying the telescope hobby is to know how to set up and tear down your equipment quickly. This is especially true around Pittsburgh where the weather can change instantly from perfect to disastrous. Over the past couple of months I have developed a reasonably systematic routine in the deployment of the telescope. With it I can set up my full video rig with automatic pointing and tracking in about 20 minutes. While not instantaneous, this is pretty quick, and I would say that it approaches what reasonable people can call “grab and go.” The following is my reference checklist and there is no reason in the world for anyone else to read it except to be bored. But I already wrote it down, so I might as well post it. These setup instructions will work for any of the Celestron equatorial mounts. They can work for other mounts too, but a lot of the details will be different.
1. Put the mount outside. I have a spot on the patio behind my house that I use every night. This patio spot gives me a good view of most of the sky to the west and south and a reasonably good view of the north and east. The house and trees behind the house block the lower parts of the eastern sky. A large tree in the yard blocks the northwest. Otherwise things work pretty well.
2. Point the mount roughly north. If it’s already pretty dark, use the hole in the polar axis of the mount to sight Polaris, which sits right over the roof of the house.
3. Set up the Telescope. Go and get the telescope and put it on the mount. Also fetch all the accessories you’ll be using. I use my scope in two general configurations. For visual work I use a 1 1/4″ diagonal and various Televue eyepieces. For video work I use my Mallincam with a light pollution filter and focal reducer on it. In addition I’ve been using the Celestron F6.3 focal reducer on the back of the scope lately. So I attach that as well. The camera goes straight into the telescope without a diagonal. This is more convenient. I attach it with a Televue 2 inch visual back because I had the camera fall out of the crappy Celestron visual back with the tiny little useless hateful set screws. The set screws failed to hold the camera, and it just fell out of the tube an on to my concrete patio. This sucked. The Televue is a 2 inch tube that holds the camera solidly using a compression ring. Highly recommended.
So my setup goes: telescope, F6.3 reducer, 2 inch visual back, a 2 inch to 1 1/4 inch adapter tube, then the camera.
4. Balance the telescope. This takes two steps. Set the mount up so that the right ascension axis is horizontal. Now you release the clutches on the declination axis of the mount. This is the one that points north and south and runs parallel to the axis of the telescope. Then while holding the scope, put it in various positions. Let go slooooowly and make sure that the scope mostly stays in place. I try to balance the scope when it is horizontal and when it is mostly vertical. Tracking and pointing near the zenith is a lot better if you get this right.
5. Now balance on the right ascension axis. This is the one that is orthogonal to the body of the telescope. This is easier. You want to position the weights on the counterweight shaft so that when you release the RA clutch and let go of the telescope (slooooooowly) the scope does not move. This is the simplest mechanical task that there is in astronomy, as far as I can tell.
Some people tell you to purposely set the balance to be a bit heavy on the east side of the mount because it smooths out the behavior of the tracking motors. Depending on what part of the sky you are looking at this means either you want the either the scope side or the counterweight side to be heavier. I have never had any luck trying to do this because it means you need to shift the counterweights whenever the mount flips, and I hate touching the mount in any way after I am done aligning it. Maybe you’ll have better luck with this.
6. Put the scope in its “home” position. For my mount this is the one where the counterweights point straight down and the scope points straight north. Peer into the finder scope and look for Polaris. It should be at least in the field of view. When the scope is in this position I turn the video camera so that later on I know which way north and east will be oriented in the field of view. This turns out to be handy later.
7. Power. Now go get your power supply. I had been using a big 12V battery, but it started to fail recently, so I bought a couple of 12V power supplies that I can plug into an outlet on the outside of my house. This has proven to be more reliable the last few times out.
8. Now wire everything up for video. The camera gets a control cable, an s-video cable and 12V power. The control and video cables go back into the house through a sliding door. The video cable goes into the USB capture widget and the into the laptop. The control cable ends at the big Mallincam control box. The largest box ever built for holding five buttons and a knob.
Then I plug the telescope controller into a 25 foot cable and run the other end out to the mount. Finally, a second 12V power cable goes into the mount itself.
9. Initialize the Mount. Work your way through the Celestron setup menu. Enter the time and date and then tell it you want to do a “two-star” alignment. This alignment will let the hand controller learn how to point at things in your sky. What you will do is pick two stars on one side of the meridian (either the eastern part of the sky or the west) and then 3 or 4 stars on the other side. I tend to start in the west and then move to the east because I tend to be impatient to go and look at things that are still rising. The eastern sky is also somewhat darker than the south and west, since the PIttsburgh light dome is primarily to the west and south of me.
For most of the summer the first star that I’d pick was Arcturus. The scope will attempt to point at the star, but it will usually miss. If the scope were already perfectly polar aligned and set up in exactly the same place as the last time I was on the patio, it might hit perfectly. But, these things are never true. So, it will miss by a bit. Use the arrow keys on the hand controller to point the scope and get the star in your favorite sort of finder. I use a 9×50 optical finder, because I’ve never figured out those red dot things. YMMV.
10. Focus. The start should now be in the field of the camera. If it is not, then that means your finder scope and telescope are not aligned. If that’s the case, remove the camera and put an eyepiece into the telescope to fix that. Assuming it is, I then go inside and fire up the video capture software. If I have not disturbed the focus too much, the star will be in the video feed and mostly in focus. Still, it’s best to go and get your Bahtinov mask to make sure.
The Bahtinov Mask is an insanely clever device that creates a diffraction pattern on bright stars that will tell you exactly when you have them in focus. Just follow the instructions and you can’t miss. After I’m done I remove the make and put on the dew shield. I’ve gotten away with just using a shield, for now. If I were smarter I’d use those heated strips as well but it’s only been an issue twice in a year.
11. Star Align. Having focussed the telescope we’re ready to finish the star align. First grab the camera controller and turn on the cross-hairs. Making the cross-hairs is a bit of a chore that is too complex to describe here. Maybe I’ll make a separate page about that. With the cross-hairs set up, use the mount controller to center the star. It will look like this when you are done:

In this picture the horizontal lines point roughly east/west and the vertical lines indicate north/south. The actual directions might be reversed, but the important thing is that I’ve oriented the camera so that the arrow keys on the controller are predictable. This is a small touch that makes life easier later.
Anyway, when you have centered the star hit “Align” on the hand controller to tell it that you want to go to the next star. The hand controller will suggest another star in the western sky. You can use the menu keys to pick one that you can see that are not too close to the horizon. Center it in the finder then in the video camera, then hit Align.
11. Calibration Stars. Calibration stars refine the pointing model of the mount to compensate for its mechanical limitations. The hand controller will ask if you want to add “calibration” stars. Hit Enter to say yes and it will suggest a star in the east to use for further alignment. Pick a star that is well placed and hit Enter. The mount will then flip around and try and point there. As before, it will miss by a bit. Center and align the first star, and the hand controller will ask you about another calibration star. Hit enter to say yes and repeat. As you add more stars you’ll notice that the pointing will get more and more accurate. Usually the third and fourth stars will be in the field of the view of the camera. If this does not happen, you probably missed with one of the previous stars which means you should just start over.
12. If you have to start over, don’t be frustrated. This happens from time to time especially as the sky changes and you need to pick different stars for alignment because the ones you were using before have moved to the wrong side of the sky or behind a tree. Don’t panic. Just unplug the mount and do the whole routine again. Pretty soon you’ll end up with a new set of stars that you can use for a month or so and everything will run smoothly again.
13. Notes on Pointing. At this point, let’s review. We’ve set up the mount and we’ve told it to point at six points in the sky. Each time we’ve corrected pointing errors by hand, allowing the computer in the hand controller to build a pretty detailed model for how to point at things. My experience is that this pointing model works very well, especially if you avoid meridian flips. This is why I try to stay in the eastern part of the sky after doing all of this. If I cross back over to the west, the mount has to flip over, and this invites the creation of pointing errors. I’ve had it work pretty well, and I’ve also had results that were so bad that I unplugged the mount and started over. In one worst case, I had to wipe reset the firmware in the hand controller after some bug corrupted it. But, these are outliers. In general things work very well at this point and the total time I’ve spent from putting the mount on the patio to having good pointing is about 10 minutes. But, for video good pointing is only half the battle. In order for the mount to track over even short time exposures, we have to make sure the polar alignment is good. Luckily, this is not hard.
13. Polar Alignment. The Celestron hand controller has a wonderful piece of software in it that allows you to use the pointing model that you just worked so hard to build to polar align the mount. First, tell the hand controller to point the telescope at a star that is near the meridian and also near the “celestial equator”. All this means is that the star should not be too far north or too close to zenith. The hand controller will complain if you pick a bad star, so study your planetarium program to find a good one. I used Altair for most of the summer, and have recently switched to Enif in Pegasus after Altair wandered to the western sky. Remember, I try to stay on the eastern side of the meridian for all of this.
Now go into the Align menu and pick Polar Align and then Align mount. Hit Enter and the scope will point back to the star you just picked again. Repeat the center/align dance on the video screen. You’ll get another message from the hand controller about starting the All Star Polar alignment. Hit enter to start. The scope will now point to a different spot in the sky. This is where it thinks the star would be if you were polar aligned. At this point you put the controller down and you use the altitude and azimuth knobs on the mount to re-center the star in the field of view your finder scope and then the camera. When you are done, hit enter. Then find Undo Sync in the Align menu and hit enter on that too.
14. Polar Alignment Notes. There are a few things to keep in mind with this Polar Alignment scheme. First, you always want to end your alignment by moving the altitude of the mount up. You want to do this because the knob in the back that changes the altitude gets tighter when you push the mount up, which means it will stay in place better when you are done. I loosen the knob at the start end give the mount a shove downward so I know I’ll have room to move up later.
Second, it’s really handy to have a remote version of the video feed near the mount while you are playing with the knobs. I use VNC on my iPhone so I can see my laptop screen without needing to run back to the laptop. It’s also handy to use this trick when focussing.
Finally, the Undo Sync is important. The first part of the Polar Align routine “syncs” the mount to the star you picked. This messes up the pointing model to make pointing near the star accurate. But, as you move away from the star the mount points less and less well. Also, if you move the mount a large distance while finishing the alignment you may find that your pointing gets way off. In that case, unplug the mount and redo the star align. In my experience this hardly ever happens. The one time thought I needed to do it, my pointing didn’t really get any better and then it turned out that a cable snag was the reason the mount was pointing half a degree too far south all the time.
15. Final Notes. I’ve just described my setup process in about two thousand words. But you should not be discouraged by this. With practice I can do all of this setup in about 20 minutes. While this seems like a lot of up front work, remember that the guy that just goes in the house and grabs his manual alt-az on a tripod will then probably spend 5 minutes star hopping to each dim deep sky object that he wants to look at. Meanwhile, when this process works well, you can spend the next three or four or five hours with objects that are invisible in the eyepiece hitting the tiny chip in that video camera dead center every time.
Using this setup routine I’ve been able to get the Celestron CG-5 mount to do the two basic things you need an compuerized equatorial mount to do:
1. Point at things accurately.
2. Track objects in the sky for time exposures.
I use two telescopes on the mount, an 8 inch Celestron SCT and a new 85mm Televue refractor. I run the 8 inch scope at a focal length of between 1000mm (F5) and about 700mm (F3.5). On the best nights, the mount will point this scope so that every object I ask for is just about dead center on the Mallincam’s small chip. This means that we are hitting a field of view that is at most half a degree wide and about 22 arc minutes tall every time. That’s similar to the field you would get using a 100x eyepiece, which is pretty good.
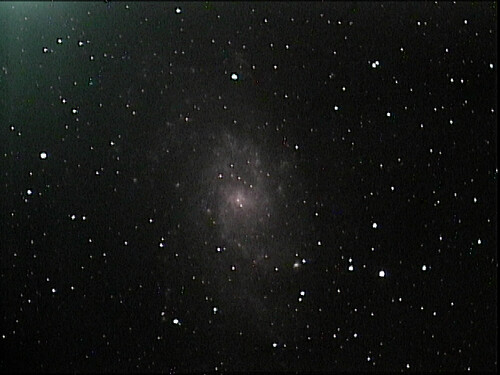
The refractor has a native focal length of 600mm and I can also run it with a focal reducer and extension tube to get to about a 400mm focal length. This gives me slightly more than a degree of field of view so I can fit bigger things, like
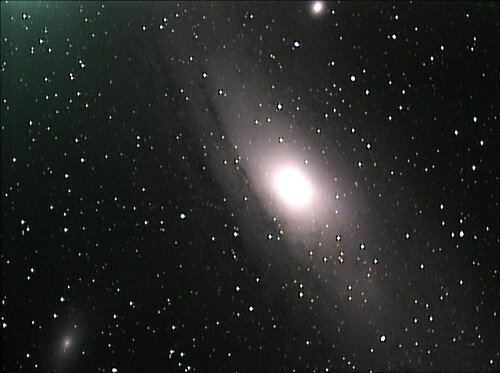
or
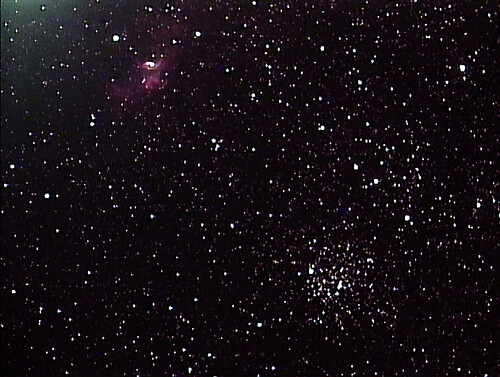
or
The main complaint I have about this mount is that it does not track smoothly. I’ll sometimes get 4 frames in a row at one or more minutes that are perfectly sharp and then right after that I’ll get 4 frames in row where the object jumps 3 or 4 pixels to the east or west. I could try using a guider to clean this up, but I get the feeling that the guider will not be able to deal with these large jumps over relatively short exposures.
In the future I plan to spend a ludicrous amount of money on a mount that will track much more smoothly. But I predict that when I do so I’ll miss the relative sophistication of the Celestron software. Being able to use the video camera in the main telescope to do polar alignment can’t be beat. Hopefully the other guys will decide to try and catch up.
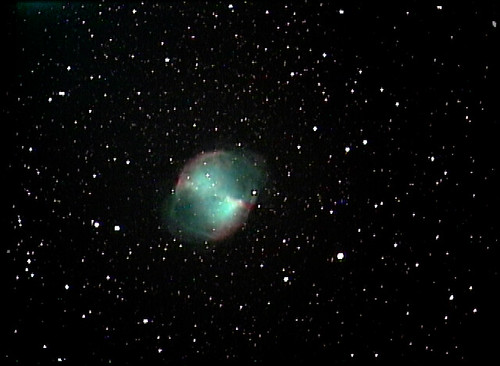
At this point I am morally obligated to end this post with yet another picture of M27. So here you go.
Clear skies to you all.