Wednesday, April 24, 2013

Sky and Telescope, April 2013

After my previous little nostalgia trip into the glory days of astronomical magazine publishing, I decided that it might be cool to be able to read S&T on my iPad. Back when the iPad was announced there was a lot written about how it might save the magazine as a form by allowing for seamless and easy electronic delivery of the content. Sadly, this happy world has not come to pass because while magazines may know a lot about writing and organizing content the truth is that they simply do not understand electronic distribution.

When I am being more charitable I try to give them the benefit of the doubt. Here are a group of people who wrote their little articles and sent them to you and I in basically the same way for a hundred years. And then some asshole hipsters with their "computers" and "data networks" come along and mess everything up. Now they have to give away their words for free, and lay them out on "pages" that have no page boundaries at low resolution and with shitty typography. Any rational person would just throw up their hands and say "fuck this, I can't work like this" and just give up.

But then I go to the Sky and Telescope web site and stare at it in the light of day and my sense of charity evaporates faster than water on the surface of Mercury and is replaced by me wishing that they had just thrown up their hands and said "fuck this, I can't work this way."

To say that the user experience of subscribing to Sky and Telescope on their web site is "bad" is to insult the word "bad." Here is what happens:

1. You go through a standard sort of shitty checkout process. Their site does not use the Amazon payment engine (or the iTunes store), which means you will hate it.

2. After you are done, you get some e-mail confirming that you ordered something.

3. They give you a free login for the digital subscription! Excitedly, you go to you iPad and tediously punch in all the information.

4. The iPad says that you can't download the issue because you have no subscription.

Confused, you go back to the web site and note that you can read the current issue on a web-based piece of shit flash reader. You are depressed.

You navigate back to the main web site and try and figure out what you status is. You login with the information that the subscription engine sent you, but it does not work. Instead you are send to a page with this text on it:

Register now!

NOTE: Website registration is separate from registration at ShopatSky.com and from registration for your digital subscription.

I don't remember exactly how, but after reading this page, and doing some more surfing on their site I came to two conclusions:

1. First, I'm not sure who they paid to do their subscription payment system, but I hope they did not pay them much. After fighting through a page flow that is 10 times worse than the one Amazon launched with in 1994 all that system does is print your name on a small index card which is then passed to a standard magazine subscription office. There, some small group of septuagenarian paper pushers queue you up to get a copy of the print magazine in "4 to 6 weeks", at which time the digital subscription on your iPad will also kick in. I don't want to sound like I have anything against small offices full of septuagenarian paper pushers, but this is fucking insane.

2. Second, having spent all that money on the worthless payment system, they then built at least two more worthless payment/registration systems for al of the rest of their "services" (the web site, and the store). This gives you, the end user, the great pleasure and convenience of needing to keep track of three logins in order to interact with the media behemoth that is Sky and Telescope. Again, this is insane.

What the Sky and Telescope web site tells me about the company behind it is that it is Kodak. Recall that Kodak had a long standing business model for turning some specialized chemical processes into large piles of cash. Various people in the company saw the technology that would come and destroy this model, and they even worked to embrace and take advantage of it. But ultimately they could never let go of the old business and as it slowly sank into the muck it dragged the rest of Kodak down with it.

Magazine publishers are in a similar position now. They have collected and distributed their content the same way for the better part of more than a century. Ten or twenty years ago it became clear that this scheme was not going to survive for too much longer. It was even fairly clear how it was going to be replaced. But rather than take the bold (and risky) move of going all in on the new model, they are hedging. They want to keep their print business going while easing into the digital one. But all this means is that they will be incompetent at both.

The fundamental theorem of digital content is that it must be available immediately on any platform that I own where-ever I might be and however I paid you for it. There is no value gained by limiting access in any way. That just pisses your customer off. Your customer is now expecting to be able to buy and consume your product anywhere and any time she pleases. Furthermore, if you stand in the way of this expectation, she will just leave and find something else because she is carrying the entire library of everything ever published in her pocket.

There is not a single person at Sky and Telescope that truly understands this theorem. At least no one in a position of power. If there was, their digital services would not be as sad as they are.

I now hear you saying, "but Pete, Sky and Telescope is just a poor small publisher. Have some pity. It can't be easy to extract those tens of dollars from the few thousand 45-65 year old males who read this stuff."

In reply I will only tell you that the online experience at The New Yorker is no better than this same awful bullshit that you get at Sky and Telescope. And the reasons are exactly the same. Oh, the New Yorker thinks it's trying to play the game. It has the twitters and you can read some of their stuff in Flipboard and other new fangled channels on the iPad.

But do this:

1. Make a digital subscription with the iPad app but with your iTunes account and not their web site.

2. Now go to their web site and try to look at the digital archives, which are supposed to come with a digital sub.

Result? You can't. Why? Because they have separate subscriber databases for the iTunes in-app purchases and purchases from the web site. Why? Because they don't know what they are doing and they don't care enough about the right distribution model to fix it.

Of course, if you get a print subscription, through the same small office of septuagenarian paper pushers that Sky and Telescope uses, it will probably all work peachy. So, the New Yorker is also Kodak.

I would not be so enraged about this if there were not obvious examples of how to do this right staring me (and them) right in the face. Again the jocks are doing better than the nerds here because ESPN, Bill Simmons and their collective web site: grantland.com is a template for content delivery in the modern age. This is not surprising since 20 years ago Simmons looked at the Boston Globe on the one hand and the Internet on the other and realized that he had a better shot on the network than getting a job writing columns at the Globe. He started writing online, then got a gig at ESPN and now runs one of the largest and best online content publishing businesses in the world. Their template?

1. The content is intelligent (for sports and pop culture), long form, not laden with a lot of online SEO bullshit, and most important it is always available.

2. They get some money from ads.

3. They also get some money from special print projects that reprint the online content in a nicer more premium form.

I would bet that if they wanted they could do some kind of subscription service. I would also bet that if they did this it would not take 4 to 6 weeks for the content to start appearing on your iPad.

This is content delivery done right. And this is nothing like what Sky and Telescope or The New Yorker manage to do.

Anyway, as enraging as all of this is, I only have myself to blame. I should have known that nothing good could come of getting a print subscription from an aging dinosaur of a magazine in the vain hope getting a usable iPad experience. I was doomed to fail from the start. What I'm hoping is that they actually do have some bright young mind in their midst who will show them how to do this right and that they'll get there fast enough to not share the same fate as Kodak, drowning in the muck as the rest of the world passes them by.
Wednesday, April 10, 2013

How to Polar Align Your Mount, A Survey


Polar Alignment is where you carefully make sure that the right ascension axis of your mount is exactly parallel with the rotational axis of the Earth. When you get this right, your mount can track any star in the sky just by rotating around its RA axis. If you get it wrong, stars slowly drift off of your field of view and the field will slowly rotate as you track from east to west. The amount of tracking error you get will be proportional to how far off you are. Finally, for various reasons, while an auto-guider and compensate for drift, it cannot compensate for the rotation.

Getting the polar alignment right is ultimately a problem of geometry. You want to measure the geometry of your mount with respect to the Earth's rotational axis. To understand how all of the various methods work you need to be able to visualize in your mind how deviations from the correct geometry will affect the tracking of the star. Sadly, I lack the graphical skills to really draw this out for you. But, because we have the Internet you can go and look at the excellent diagrams in this article by Frank Barrett and it will teach you everything you need to know. With those pictures as a basis, here are some ways to get polar aligned.

0. Preliminaries

Some terms you need to know. The meridian is an imaginary circle splits the night sky into east and west halves. In my yard in Pittsburgh it runs through the north pole and around to the southern part of the sky. If your yard is in New Zealand, then it runs from the south pole up and around to the north.

The celestial equator is the circle in the sky that has a declination value of zero. If you had a globe of the universe it would be the line that splits the sky into north and south halves.

The North celestial pole is what you polar align to in the Northern hemisphere. If you live in the southern part of the world, then you want the south pole. Everything still works the same way, it's just upside down.

Finally, you align your mount using mechanical adjustments on the base of the mount head. The mount have knobs that let you raise and lower the altitude of the RA axis and also spin the axis in azimuth. These are the controls you use to polar align the mount.

1. Polar Scope

Most equatorial mounts that are used these days are of the so-call German design. GEMs are characterized by having the telescope ride on top of the declination (north to south) axis with a counterweight on the other side. The RA axis sits perpendicular to this arrangement.

Most GEMs also have a hollow RA axis. In the Northern hemisphere, this means you can usually get a rough polar alignment by sighting through the RA axis and putting Polaris in there. This will get you close enough for a lot of work, but it's not good enough for taking pictures.

Some mounts have a small telescope that sits in the RA axis with a picture of some sort in it. The Losmandy style polar scopes have a little diagram with Polaris, Ursa Minor, Ursa Major and Cassiopeia in it. The idea is that if you can wiggle the mount until Polaris and two other stars are in the right holes, you'll be even closer than you were before. This works OK for some people, but I never had much luck.

The Takahashi (and now Astrophysics and iOptron) mounts have a reticle that looks like a clock in them. You run some software that tells you where on the clock face Polaris should be and you stick it there. If the polar scope is well calibrated with the RA axis, you are polar aligned. If it's off, you'll still be off.

The Tak mounts have the scope installed in the factory and are very well calibrated. The Astrophysics scope requires that you install and calibrate it yourself, so mine is a bit off. I could work harder to get it closer, but I lack the mechanical fortitude to get it really accurate.

2. Pointing Model Alignment

This is what most computerized mounts use for helping you polar align. The computer or hand box connected to the mount will ask you to center multiple "alignment stars" one at a time. As you do each one, the mount makes a note of the pointing error and builds a simple linear model of the relationship between where it thinks it should go and where things actually are. This model compensates for various sorts of errors that make pointing less accurate.

Among other things, this model can compute how much of the pointing error is caused by polar alignment error. So, after building the model typically what you do is point at a star and the software will displace the mount according to the error it computed. You then center this star in the telescope my mechanically adjusting the altitude or azimuth of the polar axis, and you are done. I've used the Celestron version of a scheme like this and it works very well.

3. Drift Alignment

Drift alignment is the classic astrophotographer's tool. If you read the pdf at the beginning of this article you'll already know how this works. Here is what you do. First put a high power retical eyepiece in your telescope and rotate it so that the lines correspond to north/south and east/west motions of the mount. Now point at a star near the intersection of the celestial equator and the meridian. Center the star carefully in a high power eyepiece. Now watch the star move in the eyepiece. if the star drifts north or south, you adjust the azimuth east and west respectively to fix the drift. Keep adjusting until there is no drift after a few minutes (or up to several minutes if you want to be really picky).

Next point the telescope at a star fairly far to the east or west and also on the celestial equator. Do the same observation in the eyepiece but now if the star drifts north adjust the altitude higher, and if it drifts south lower the altitude.

If you study the diagrams in the pdf and think about the geometry, its pretty clear why these are the right moves.

There are two annoying things about drift alignment. First, it seems complicated. Second, it involves a lot of staring at small stars in high power eyepieces. Since its likely that you are going through all of this to take pictures with a CCD camera, the obvious thing to do it to use the camera to do it.

4. Drift Alignment with a CCD Camera

This works exactly the same way as the scheme above but you use computers to make it easier. First, since your mount can point itself, you use the pointing computer to find the stars. Second, you use your CCD and computer to watch the star for drift. Finally, if you want to get fancy, you use a third piece of software to analyze the drift and tell you how to adjust the mount.

This is super convenient. You plop your mount outside, point it roughly at Polaris and then set up your camera (which you'd have done anyway). Then you let the computer stare at the star for a few minutes and when it's all done you are polar aligned. I've been using this scheme with a piece of software called PEMPro and it's great.

Another scheme that does not require extra software is outlined here: http://www.observatory.digital-sf.com/Polar_Alignment_CCDv1-1.pdf.

5. Plate Solving

Recall that a plate solver analyzes the image that you took and calibrates the stars in the image with known catalog stars. It can then use the positions of those stars to compute the actual coordinates of the center of the picture. Plate solving is fantastically useful for various things involving pointing your telescope. It requires a computer and a large star catalog to work, so it is not used as much as it could be. But there are now free Internet plate solvers, and the software fits into even cheap computers, so I think people will start using it more.

Anyway, you can use a plate solver to compute polar alignment error. The idea is that instead of waiting for your mount to track to measure the drift, you take two pictures, one at the initial point of the reference star and one offset by some fixed amount of RA. After taking each picture you use a plate solver to find out where you are really pointing. You then compare the difference in position to what see if the declination drifted. At this point you can work out how to adjust the mount to improve the alignment. There are a few different software packages that do this automatically.

What this scheme is really doing is shortcutting the drift alignment by moving the mount ahead all at once and then using the plate solver to compute the drift. People will quibble over whether this is as accurate as actually measuring the drift. It probably does not matter most of the time.

6. "Quick Drift" Alignment

The Astro-Physics mounts have the following clever polar alignment scheme. It uses a feature of the mount control that lets you flip the mount over the meridian whenever you want to check alignment. All you need is a finder scope with a retical eyepiece that you can rotate. You want to rotate the retical so that one line is always on the E/W axis one is on the N/S.

Now, pick a star near the meridian and near zenith and have the mount point your finder scope at it. Center the star and hit "recalibrate". Now shift the meridian either East or West by one hour depending on which side of the meridian you are on to make the mount flip over. If you are well aligned, the star will still be centered in the finder. Any shift East/West is the finder scope not being quite aligned with the mount. Any shift North/South is the mount not being quite aligned in altitude. Use the altitude adjustment to get rid of half the North/South error. Use the adjustment on your finder scope to get rid of half of the East/West error. Use the keypad to center the star the rest of the way. Flip the mount again. Iterate this process until the star stays centered.

Now pick a second star that is at also near the meridian and at least 30 degrees away of the first star. Point the telescope there. If you are polar aligned, the star will again be centered in your finder. Any shift is a result of azimuth error, so with the azimuth adjuster to remove it. Now point back at the zenith star. If it is off center, center it with the keypad, hit recalibrate, and slew back to the second star. Adjust the azimuth again. Repeat this until the star stays centered as you slew back and forth. You are done.

Again, if you think about the geometry of the problem as described in the pdf that I linked to, you'll sort of see how this works. The meridian flip simulates the E/W movement of drift alignment, and so if the star moves N/S after the flip you know the altitude is off. The second stage is similar to other iterative alignment schemes, the idea being that the pointing error on the second star is all accounted for by polar misalignment. Since you know the altitude is already right, you only have to move azimuth.

7. Notes

There really was not any point in my writing all this down. The following pages actually can summarize all of this better than I can, so here you go.

A General Survey

Measuring Alignment Error

Drift Alignment Math

Star Offset Positioning

Saturday, March 30, 2013

Sky and Telescope, April 1980


When I was in high school in the early 80s, my parents bought me one of the now classic Edmund “Astroscan” 4 inch Newtonian telescopes. This was a simple enough machine to use. The scope was a short tube with a small red bowling ball attached to the bottom where the mirror sat. You pointed the thing at the sky by rolling it around on its red ball-shaped base. Then light from the stars went into the tube, reflected off a mirror at the bottom and then a smaller mirror at the top. You can then look through an eyepiece at the top of the telescope.

I loved the little red ball, and I devoured all of the literature available to me at the time, mostly in the form of the classic Astronomy and Sky and Telescope magazines. I remember the awesome back cover ads with the orange Celestrons. I remember the Meade ads with guys in white coats hanging out near huge Newtonian telescopes on equatorial mounts with "clock drives".

But one of the strongest memories I have of that time was an article by John Dobson about the origins of the now iconic Dobsonian telescope in an old issue of S&T. I even wrote a letter to the man, who was gracious enough to reply to an enthusiastic 14 year old. The other day I saw this article mentioned in the now also iconic book by Kriege and Berry about building larger Dobs. Turns out it was published in April of 1980. On a whim I checked around and found that I could buy and download the issue at Sky and Telescope's web site. Who can resist that?

So here is what the April 1980 issue of Sky and Telescope teaches you about the state of amateur astronomy then and now.

First, I know it's shallow and consumerist of me, but I love the ads. I can still remember some of them just by their layout and typography. There is the Astronomy Book Club (4 free books if you agree to buy 4 more at full price!), there are the ATM parts by Kenneth Novak who ran the same ad with the same 4-vane secondary spider in it for what seemed like my entire childhood. There are the previously mentioned Celestron and Meade Ads. There is the nascent Orion Telescope center before they partnered with China and took over the entire world. There are ads for huge boxes that tell time with a computer. There are the Willmann-Bell book ads.

The ads tell you of a world of astronomy where the Dobsonian telescope, the CCD camera, the fast APO refractor, dozens of niche exotic optical designs and the computerized telescope mount do not yet exist. It's pretty amazing what we got by with back then.

The next thing you notice is that the quantity and quality of the content in the magazine is astounding. Sky and Telescope was one of two major publications at the time for amateur astronomers. The other one was Astronomy, but it had a more modern and populist bent. The writing in Sky and Telescope was almost academic in its style. When I was but a young man I always found it to be a bit stuffy, but now it is refreshing to find writing in a hobby magazine that is significantly above the fourth grade reading level.

The two main features that month were both written by University professors. And, the first "news" item is not about some new product to buy, but a long piece about some mysterious gamma ray burst in the Large Magellanic Cloud, complete with imaging data and graphs of gamma ray counts. The rest of the issue is filled out with discussions of comets, the usual "what's up in the sky this month" things, a historical piece about an old star atlas, book reviews (there is a review of the apparently now classic Stars and Clusters by Cecilia Payne-Gaposchkin) and so on. Finally there are more specialized articles on the various sub-genres of the hobby: visual observing, amateur telescope making, deep sky photography and so on.

The Dobson piece shows up in the long running "Gleanings for ATMs" column which ran for longer than I've been alive, as far as I know.

My second favorite piece in the issue is a retrospective of a 18-month long project by a particularly intrepid amateur named Ben Mayer to photograph all of the Messier objects. To take a single picture this guy has to

1. Point the telescope at the object. Most of the Messiers are pretty bright, so maybe this isn't too hard. Still, my iPhone does this for me now.

2. Somehow focus the telescope so that the image in the camera will be sharp while still using an eyepiece on the telescope, since the camera can't take a picture and tell you if its in focus.

3. Sit outside in the cold and the muck with the telescope guiding by hand for an average of an hour per exposure.

4. Take backup exposures.

The results are pretty good, I guess, given what he's up against. But they aren't that much better than (say) my early and fumbling work with the video camera.

Then, a couple of days after reading this I came across this forum thread about a Messier Marathon. Spring is Messier season because if you situate yourself just right you can see all 110 objects in one night.

The subject of the thread is about an attempt to get a picture of all 110 objects in one night. The ends up losing a few because he wasted an hour early in the evening troubleshooting some focus problems. But he still manages to get 105 pictures in one night using a single 3 minute CCD exposure per picture.

And his pictures are a lot better.

So … computers, CCD cameras, and exotic optics have allowed enterprising amateurs to work about two to three orders of magnitude faster with much better end results. And I haven't even mentioned the impact that the large Dob has had on visual observing.

Even though it's not really true, in my mind I see 1980 as the time when these particular sets of balls got rolling. In just a couple of more years the large Dobsonian would be a commercial force. And just a few years later people would finally start experimenting with mass market computerized telescopes and CCD cameras. We get to where are we now, when a guy with sufficient resources and know-how can make respectable images of the entire Messier catalog in one night through a long process of refinement and re-engineering. But it was around 1980 when all of these things just started to become possibilities. At least for me.

Of course, now that we have all of these things, the publications that we had then are in danger of leaving us. For the most part the hobbyist content has been competently replaced by some of the better Internet web sites and forums. What these places lack in writing quality they more than make up for in the relative density of the their content. With this large distributed database at your fingertips you can now learn things in months that might have taken years before if you had to wait for the magazines to tell you how to do it.

It's easy to think that nothing will replace the long form magazine feature. Especially in niche publishing markets like astronomy. So I guess while the marketplace has delivered us tools we could not have dreamed possible in 1980, the arrival of those tools has also resulted in the death of at least one of the reason we would dream of such tools in the first place. I guess that's just how it goes.

Or maybe not. This month's S&T has a whimsical historical piece about the role of the full moon in a Civil War battle. And last month there was an article on a CCD Messier Marathon. So maybe it's not all that different after all.

Note


If you have the same irrational nostalgia for old hobby magazines as I do, you have to consider buying this full archive of the first 70 years of S&T. The only downer here is that they didn't just make PDFs of all the issues. Instead the content is locked on these ridiculous DVDs. Oh well.

Thursday, March 28, 2013

Maxim DL Setup and Workflow

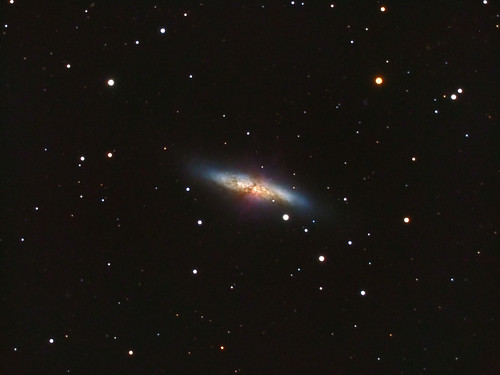
Spring in Pittsburgh remains cold and cloudy. But, I did get out for one night in March and managed to run my whole setup from end to end to get one picture. So as a final illustration of how the whole process works, I'll describe step by step how I captured this shot of M82 that night.

M82-2013-03-9-300x-LRGB-pix-sharp


Before I get started with the details, I have a few general notes. First, it's not important that you work exactly how I work. What's important is that you find a way of working that is comfortable for you. What is most important is that you do the same thing every single night no matter what. Astrophotography is technical and generally unforgiving of mistakes. Repetition and practice are powerful mechanisms for minimizing the number of mistakes that you will make in the dark and the cold.

It also helps to be conservative in setting out goals for a particular night. What I try to do is decide what one thing I want to achieve on a particular night (take a picture of those two things, or fine tune my polar alignment scheme, or whatever) and when I'm done with that one thing I tear down no matter how good the night is. Setting and hitting the goal you want decreases frustration and increases confidence, both of which are important for minimizing the number of mistakes that you will make in the dark and the cold.

The rest of this post goes over the particulars of what I do in Maxim DL to capture pictures. While the specific setup is particular to Maxim, the general scheme is not, so you should be able to translate it to however you end up working.

Maxim Preliminaries


As we've covered before, I have started to use Maxim DL as my main piece of software for image capture. I have two main reasons for this:

1. It has robust support for the SBIG ST-2000XM camera that I bought, with its unique configuration of two CCD chips.

2. I really like the image calibration and stacking workflow that it supports. It lets me set up all of the various parameters just once and then run as many images as I want with just one button.

3. Finally, its support for computer control of the mount, and the "plate solving" utility is really convenient.

The one thing it does not have is a particularly straightforward user interface. But, to get the basics set up is not too bad. You have to tell it what kind of camera you have. You have to tell it what sort of mount you have. And you have to tell it how to guide. The various dialog boxes that you use to do this are covered the extensive online manual.

For my setup, I use the SBIG Universal camera setup and then I connect to my mount using the AstroPhysics ASCOM Driver. ASCOM is a software framework for controller astronomy hardware (mounts, cameras, domes, etc). I'm not going to get into the details here. It seems to work but for the most part it also seems like its main reason for existing is to make your life more complicated.

As I mentioned in my previous post, I also have a set of calibration (dark, bias, flat) frames shot for my camera that I keep loaded into Maxim. I carefully keep my camera set up so that I can re-use flats and I generally shoot at the same temperature and using the same basic exposure times so that I can re-use darks. It's convenient not to have to reshoot these frames every time even though my pictures would probably be better if I did so.

Mount and Tube Setup


I've gone over this a bunch of times in other posts. I use a Mach-1 mount that I keep torn down in my garage in a wheeled carrier. First I take the tripod and put it on my back patio with one leg pointing north. Then I roll the mount case out to the same place and I take the mount head out and put it on the tripod. I attach it using the three bolts, but leave them a bit loose so I can turn the mount head in azimuth for rough polar alignment. Then I attach the counterweights.

My telescope tube has a plate on its bottom that goes a QR saddle on the top of the mount. I go back in the house and grab the tube and slide the plate into the saddle and then tighten all the knobs down.

I keep the camera attached to the tube in the house. This leaves it set up in the same place every night which means that the optical system is pretty much always in the same configuration. So far this also means I've been able to keep using the same set of flats that I shot a few months ago. This probably won't last.

After the tube is attached I make sure it's reasonably balanced in the mount. The Mach-1 doesn't really care. Then I put the mount in what AP calls the "Park 1" position. In this position the tube is pointing north and horizontal and the counterweight shaft is pointing east/west and is also horizontal. I use a level to fine tune things.

While I wait for it to get darker, I run cables from the mount and camera to my laptop. I then fire up Maxim and any other software that I want and get the ASCOM driver connected to the mount. Finally, I run back outside and power up the camera too. Maxim will then connect to it and tell it to cool down to shooting temperature. I try to use the same temp every night so that it matches the dark frames I already have.

Polar Align


Next I polar align. First, I wait for it to get dark enough so I can see Polaris through the polar alignment scope on the mount. This is a small telescope that sits in the right ascension axis of the mount. Astrophysics has a great new polar alignment telescope with a right angle viewer that makes this very easy. The new scope has a simple circular reticle shown here and there is software to tell you where Polaris should fall on the reticle. So, you just look in, put Polaris in the right box and then you are done.

After this initial setup I then run the "quick drift" finder-scope alignment that I have described before. I have also taken to using my camera to do software-assisted drift alignment, but that really needs its own article.

I do these second steps mostly as a check on the first step. Also, in the summer it will probably take a while between when I set up and when it gets dark enough to start shooting anyway, so you might as well fine tune.

Focus and Frame


When the basic alignment is done, you tell the mount to point at a medium-bright star. Center this star in the camera and do a "Recal" operation on the mount. This syncs the position of the star in the catalog with where the mount thinks it is pointing and for the most part allows the Mach-1 to point the telescope pretty accurately.

Note that Astrophysics uses the term "Recal" or "RCAL" to mean the same thing as what most other systems call "SYNC". This is an endlessly confusing and annoying detail in the Astrophysics software. You have to be careful not to tell an Astrophysics mount to SYNC because its SYNC operation also makes assumptions about what side of the pier your tube is on that may or may not be true if you are not careful. The best thing to do is to tell the ASCOM driver to translate all SYNC requests into RCAL requests. Then you can't go wrong.

With the star synced up I put the Bahtinov mask on the front of the tube and focus. Here you capture frames and turn the focus knob until the diffraction pattern is perfectly centered, as in this wikipedia page. This mask is a great device.

At this point I also put the dew shield on the telescope so that the front corrector plate does not fog.

Frame the Target


Today I'm taking a picture of a pretty easy target. The galaxy M82 is in Ursa Major and is pretty bright. It also has a unique cigar-like shape as a result of being torn up by some violent gravitational forces from other nearby galaxies. I tell the laptop to tell the mount to point at M82. It goes there.

Then I take a short 10 to 30 second frame with Maxim to make sure we got it right. If the object is off center, I'll plate solve the picture with PinPoint to find out where I'm really pointed and then use the "center on the place I click" functionality in Maxim to center the picture.

Pinpoint has a lot of knobs, but for the most part I bring up the processing window shown here and just hit the button. Pinpoint works out where it is and then you go back to the telescope control window and click the "Select new Center Point" button to center the target. Maxim will then ask you to click anywhere in the captured image and move the scope to where you clicked.

This all works great as long as you remember to:

1. Connect Maxim to your mount with ASCOM.

2. Take the picture to plate solve after you have done step 1. Maxim writes position data into the meta-data of the image file and uses that to run the plate solver.

Guiding Setup


Setting up the guider is usually the trickiest part of the night. First you tell Maxim to take a 2 or 3 second picture with the guider CCD. When all goes well there is a nice bright star right next to the object you are shooting that hits the second CCD in the SBIG camera just right. In that case, you are golden. The guider UI in Maxim has three modes: Expose (to find the guide star), Calibrate (to calibrate the motions of the mount to the motions of the guide star) and Guide (to start guiding). On good nights you go through each of these modes one by one and then Maxim guides perfectly all night. In my experience this happens about 75% of the time.

Two main issues come up when using the guider chip in the SBIG. First, the chip just might not hit any stars that you can guide on. Second, there might be something there, but it ends up being too dim in one of the filters (usually the blue one) to guide on. I then find myself slewing the scope around looking for a good star. If I were more systematic I'd get a piece of hardware that lets me rotate the camera to find a good star. Also, I'd have a more systematic way to lay out the field of the camera in my planetarium software to know where to find a good star.

As it is, I've only had real trouble with this once, so I'm putting off adding more complexity to my system until this presents a consistent problem.

One important tip: since the guider CCD in the SBIG cameras sit behind the color filters (more on the filters later) always test the guider using the blue filter before moving on. Usually when you have trouble it's with the blue filter because many stars are dim in those wavelengths. So testing with the blue filter ahead of time will pay off.

Anyway, once the calibration works, just turn guiding on. Watch the error graph for a while to make sure it seems happy.

Capture Setup


My standard capture routine is for a series of 5 minute frames. I picked 5 minutes because it's easy to do math with it and it seemed like a reasonable tradeoff between sky glow and image detail. Also, my first few images taken with 5 minute "subs" worked really well so I saw no reason to change.

Each frame is captured in black and white and shot through either a red, blue, green or clear filter. The clear filter captures what we call a "luminance" image.

Exactly how many frames you capture depends on what you want to achieve in the picture. Generally speaking the more frames you take the less noise you will have. Less noise, to a first approximation, means more detail is possible. Therefore, some guys spend multiple nights taking dozens of hours of total exposure to create the very best and noise-free picture that they can. This is not my goal.

My goal is to take a reasonably decent snapshot of more than I can see myself. I'm more interested in seeing some different things than maximizing the image quality. This is originally why I started with the video camera, but I decided that a little more time to improve picture quality was worth it.

I have settled on taking around 10 "L" frames, and then 5 each in R, G and B. This takes a couple of hours per object, give or take. Sometimes I'll take more on faint objects. Sometimes if I want to fit two objects into a long night, I might go shorter. You'll notice that what we are really doing here is capturing what amounts to mostly a black and white picture (L) and then layering a bit of color data into it. The black and white data provides most of the detail. The color data just makes it look pretty. A more in depth discussion of exactly how people came up with these scheme is beyond the scope of what I want to talk about here. It's sort of all a lie, but it works anyway.

For M82 I had early darkness and got set up quickly, so I took a total of about three hours of exposures.

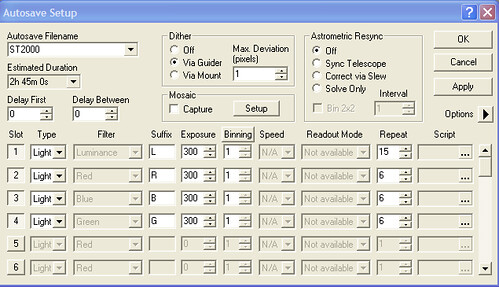
The way you do this in Maxim is to setup what they call an "Autosave Sequence". As usual, the interface for this is somewhat arcane and tedious. The nice thing is that once you get something you like you can save it and never have to set it up again.

The sequence tells Maxim to capture "groups" of frames each with different filter, binning and exposure parameters. Maxim will then run through these groups in order and take all the frames you need. You also tell it where on your computer to save the frames and you can give it a scheme for generating unique file names with sequence numbers and stuff.

So, I set up a sequence for 15 L frames of 5 minutes each, and then 6 frames with each of the red, green and blue filters, also 5 minutes each. The screen looks like this:

Screen Shot 2013-03-28 at 9.52.35 PM


Capture


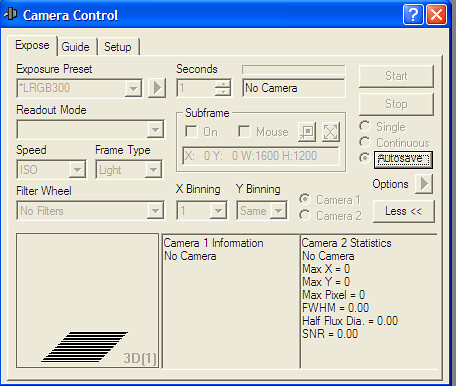
After you set up the sequence you just hit the go button in the camera control window:

Screen Shot 2013-03-28 at 9.53.16 PM


If that screenshot were from a live sequence, the "Start" button would be enabled that that's the one you would have hit. You can pause the sequence by stopping it and then restart by hitting the Start button again with the control key down, I think.

I use this so that I can stop the sequence in the middle and check focus. Focus will tend to drift over time as the telescope cools off, so while you take frames you have to watch and see if they are getting soft. Maxim also will give you various measures of how sharp it thinks each frame is, so if these change drastically you also know it's time to focus.

To refocus, I sync the mount then point to a nearby medium bright star. Then I focus again with the Bahtinov mask and then I point back to M82. The mount is good enough to put my target almost exactly where it was before. If it's a bit off it's not a huge deal because the image processing software an register the frames just fine as long as they are close.

At this point you just sit back and do something to keep yourself busy while Maxim captures the pictures. I tend to surf the Internet or play Counterstrike.

Teardown


When the sequence is finished I turn everything off and tear the mount down. This is basically the reverse of the setup sequence. Warm the cameras up. Cover the scope. Turn the lights on. Disassemble everything. Put it all back in the garage.

Post-Processing


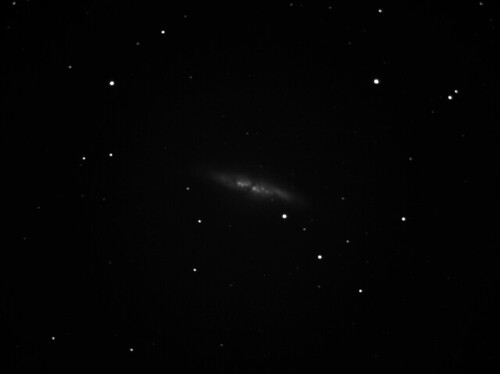
At this point you are done and what you have to show for it is a few dozen large black and white digital pictures of something. Each one looks something like this:

Screen Shot 2013-03-28 at 10.05.29 PM


At this point I use Maxim to:

1. Calibrate each raw frame with the darks and flats I took before.

2. Register and stack the R, G, B, and L frames into four separate composite images.

The calibration removes all of the fixed noise from the camera and optical system, as we discussed before. The stacking averages out the rest of the noise that we have accumulated while shooting the pictures. There are a ton of different ways to do calibration and image stacking. I pretty much stick to Maxim's defaults and I tell it to stack using one of the methods that also incorporates a median filter into the process. Using some median filtering allows the stacking process to get rid of pixel values that are very different from the ones that surround them. This is useful for filtering out random noise and sometimes the occasional jet trail. I should cover image stacking techniques in another article.

The final step is to take the final four images and combine them into a single color picture. But that's a longer story for another time.

More Things to cover next time


1. Polar alignment details.

2. Image stacking.

3. RGB combine and final post processing.

Saturday, February 23, 2013

Flat Field Adventures and Maxim Workflow

One of the nice things about astronomy is that the Universe doesn't change much. You can leave it alone for months or years and when you come back everything that you remember will still be basically in the same place. You have to remember this when winter comes to Pittsburgh, because it can be a long time between clear nights.

My last two telescope years have actually been pretty good. I count several dozen clear nights in each year, even during the winter. Even so, I took a few weeks off in December and January partly for the mental break and partly because setting up the equipment in the dark and the cold is not enjoyable.

This year I took a similar break and then the weather stretched it from the middle of December until the end of Feb. And it's still going. At this rate I might miss my now annual run through the spring galaxy clusters. This would be a shame, but like I said, they'll be there next year.

In the mean time I can get back to covering what I promised to talk about before this long hiatus. In my previous adventure I had finally set up a camera with guiding. In addition, I finally came to the conclusion that I needed to develop a more systematic capture and processing workflow.

Recall that when capturing CCD pictures in the dark you need to do more work than just taking the actual pictures. In fact, you capture four types of pictures which we will also call "frames".

1. Lights - The actual picture.

2. Darks - Pictures captured when there is no external light hitting the sensor. Exposure time and CCD temperature must match what you used for the lights. This captures the basic noise characteristics of the camera and allows you to subtract this noise from the lights.

3. Bias Frames - This is like a dark frame but with zero exposure. Captures the read noise of the camera. Bias frames can be used like darks for short exposures. In addition you can use bias frames to "scale" darks to different exposure times.

4. Flats - Pictures of the optical system taken from the camera's point of view. We divide this into the lights to remove dust shadows, vignetting and so on.

Of these frames, flats are the most problematic. What you need to capture them is an absolutely uniform light source pointing into the telescope. You take exposures long enough to get to a nice "middle gray" level where the CCD wells are about half full. Then you average a few dozen frames.

The issue is where you find an absolutely uniform light source.

The ideal way to take a flat would be to point the telescope at a blank patch of sky that is just like the one you are going to take a picture of and capture that. There are issues with this though:

1. The sky has stars in it.

2. The sky is usually dark.

This leads to the idea of "twilight" or "dawn" flats where you point the telescope at a patch of sky just as the sun is going down or something up. The illumination, in theory, will be even. There will be no stars in the way. The problem you have now is that you only have a window of several minutes before the sky is either too bright or too dark to be useful. So you must scramble to get it right. Also, the brightness of the sky is constantly changing, so it's a headache to get the exposures to be uniform.

I tried to do sky flats this way a few times and could not get reliable results.

What I ended up doing was to take low-tech "t-shirt" flats. Here you tie some sort of uniform thick white cloth to the telescope and point it down at the ground into a reasonably uniformly lit piece of shadow. I used an area behind my house. Then, when you can get exposures that are short enough you take flat frames through the cloth which acts as a diffuser.

This worked pretty well for me and I managed to take one set of flats that I used for all of my pictures in the late fall and early winter this year.

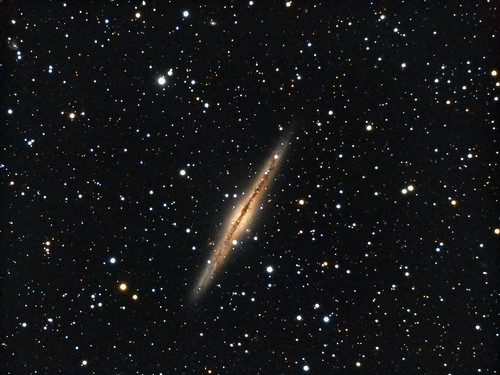
NGC891_2012_11_10_LRGB-pix-sat-sharpen-PS


The results are still a bit variable. Sometimes when I apply the flats I get nicely uniform frames, other times there are still obvious gradients. Still, the improvement was large enough that I did not have to go as crazy with the gradient removal tools in Pixinsight in order to control the noise. The frame above has a decent background while not crushing a lot of detail into the blacks.

The truth is that I should shoot a set of flats every time I go out with the camera. But I am lazy and do not do this. You only "really" need to reshoot the flats if you change anything about the optical path. Things that count as changes are: rotating the camera, moving the camera back and forth, adding things in front or in back of the camera, and so on. So I leave my camera in the telescope and never touch anything but fine focus and hope that the CCD gods will have mercy on me. This is because I am lazy, but it doesn't make for good flats.

Shooting flats with a shirt at dusk is a pain and I don't have time for it. The answer is to find an artificial light source that I can attach to the telescope and use any time I need it. An LED backlight panel in a box would work well for this, for example. Several such products now exist based on this idea, so I'll probably get one. As always, money is cheaper than time.

Having captured all your frames the next thing you will notice is that managing them is a pain. Darks must match light frames in temperature and exposure time. Flats also need to match up with the raw frames. If you are taking separate red, green and blue frames than any given picture might well be a construction of more than a hundred raw frames. Keeping track of which frames go with which is a tedious nightmare, but it's just the sort of thing that is made for computers to do. Computers love keeping track of tedious shit.

Enter the Maxim DL processing engine. When you capture bias, darks and flats in Maxim the program carefully annotates all the files with various meta-data about exposure time, filters used and so on. It then automatically groups sets of frames that have matching meta-data together into "calibration groups". Then, when you come back with a set of light frames, Maxim will look at the meta-data on those frames and automatically find the closest matching calibration groups to use to calibrate the lights.

The result is that all you need to do for calibration is:

1. Set up your telescope.

2. Do a run to capture all the calibration frames.

3. Put all the frames in one place on your computer.

4. Point Maxim at that place and make a calibration group.

Then when you take a new set of pictures you just tell Maxim to calibrate all of them using the appropriate calibration group, and it just happens.

You can read about all the details here.

The only thing I have not tried is to see what happens when you have multiple groups that match on the basic image meta-data (temperature, filter, etc) but differ only in the date on which they were taken. This will happen since you need to periodically update the calibration frames since the performance of the CCD will drift, or you might change your telescope and need new flats. But, you want also want to keep the old calibration frames in case you want to re-process old pictures. It would be truly magic if Maxim also kept track of this for you. But nothing in the docs say that this is so.

Anyway, with the calibration engine in place, the basic workflow with Maxim boils down to this:

1. Set up your camera parameters. You only need to do this once.

2. Set up standard "sequence" of frames that you will normally use. For example I have one that is 10 luminance frames (no filter) and then 5 each in R, G and B with a standard exposure time of 5 minutes per frame.

3. Shoot a set of calibration frames for each of the standard temperature and time settings you use. Store these away.

Then to capture pictures:

1. Set up your telescope and camera using whatever scheme you like.

2. Focus. (Focus is actually it's own set of problems, since focus drifts over time as the telescope changes temperature. This is a tedious pain in the ass, but the subject of another article). I use a Bahtinov Mask for this.

3. Point the telescope at the object you want to capture. Use the plate solver to center center the object where you want in the frame.

4. Find a guide star and calibrate the guider on it. This is the subject of a large amount of angst which I will not get into now.

5. Run the exposure sequence.

If all goes well you'll end up with 25 light frames and a set of calibration frames that you can use for the first steps in processing the image.

Next time, things that will go wrong and what to do about them. And, what to do with those 25 light frames once you have them in your pocket.