My last two telescope years have actually been pretty good. I count several dozen clear nights in each year, even during the winter. Even so, I took a few weeks off in December and January partly for the mental break and partly because setting up the equipment in the dark and the cold is not enjoyable.
This year I took a similar break and then the weather stretched it from the middle of December until the end of Feb. And it's still going. At this rate I might miss my now annual run through the spring galaxy clusters. This would be a shame, but like I said, they'll be there next year.
In the mean time I can get back to covering what I promised to talk about before this long hiatus. In my previous adventure I had finally set up a camera with guiding. In addition, I finally came to the conclusion that I needed to develop a more systematic capture and processing workflow.
Recall that when capturing CCD pictures in the dark you need to do more work than just taking the actual pictures. In fact, you capture four types of pictures which we will also call "frames".
1. Lights - The actual picture.
2. Darks - Pictures captured when there is no external light hitting the sensor. Exposure time and CCD temperature must match what you used for the lights. This captures the basic noise characteristics of the camera and allows you to subtract this noise from the lights.
3. Bias Frames - This is like a dark frame but with zero exposure. Captures the read noise of the camera. Bias frames can be used like darks for short exposures. In addition you can use bias frames to "scale" darks to different exposure times.
4. Flats - Pictures of the optical system taken from the camera's point of view. We divide this into the lights to remove dust shadows, vignetting and so on.
Of these frames, flats are the most problematic. What you need to capture them is an absolutely uniform light source pointing into the telescope. You take exposures long enough to get to a nice "middle gray" level where the CCD wells are about half full. Then you average a few dozen frames.
The issue is where you find an absolutely uniform light source.
The ideal way to take a flat would be to point the telescope at a blank patch of sky that is just like the one you are going to take a picture of and capture that. There are issues with this though:
1. The sky has stars in it.
2. The sky is usually dark.
This leads to the idea of "twilight" or "dawn" flats where you point the telescope at a patch of sky just as the sun is going down or something up. The illumination, in theory, will be even. There will be no stars in the way. The problem you have now is that you only have a window of several minutes before the sky is either too bright or too dark to be useful. So you must scramble to get it right. Also, the brightness of the sky is constantly changing, so it's a headache to get the exposures to be uniform.
I tried to do sky flats this way a few times and could not get reliable results.
What I ended up doing was to take low-tech "t-shirt" flats. Here you tie some sort of uniform thick white cloth to the telescope and point it down at the ground into a reasonably uniformly lit piece of shadow. I used an area behind my house. Then, when you can get exposures that are short enough you take flat frames through the cloth which acts as a diffuser.
This worked pretty well for me and I managed to take one set of flats that I used for all of my pictures in the late fall and early winter this year.
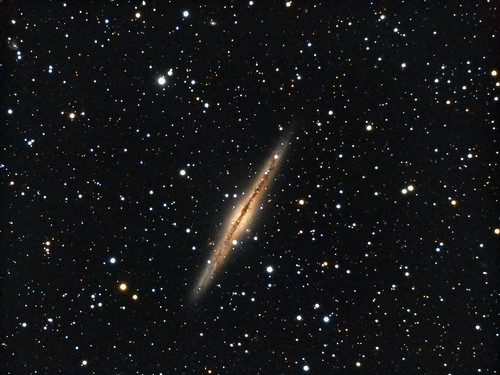
The results are still a bit variable. Sometimes when I apply the flats I get nicely uniform frames, other times there are still obvious gradients. Still, the improvement was large enough that I did not have to go as crazy with the gradient removal tools in Pixinsight in order to control the noise. The frame above has a decent background while not crushing a lot of detail into the blacks.
The truth is that I should shoot a set of flats every time I go out with the camera. But I am lazy and do not do this. You only "really" need to reshoot the flats if you change anything about the optical path. Things that count as changes are: rotating the camera, moving the camera back and forth, adding things in front or in back of the camera, and so on. So I leave my camera in the telescope and never touch anything but fine focus and hope that the CCD gods will have mercy on me. This is because I am lazy, but it doesn't make for good flats.
Shooting flats with a shirt at dusk is a pain and I don't have time for it. The answer is to find an artificial light source that I can attach to the telescope and use any time I need it. An LED backlight panel in a box would work well for this, for example. Several such products now exist based on this idea, so I'll probably get one. As always, money is cheaper than time.
Having captured all your frames the next thing you will notice is that managing them is a pain. Darks must match light frames in temperature and exposure time. Flats also need to match up with the raw frames. If you are taking separate red, green and blue frames than any given picture might well be a construction of more than a hundred raw frames. Keeping track of which frames go with which is a tedious nightmare, but it's just the sort of thing that is made for computers to do. Computers love keeping track of tedious shit.
Enter the Maxim DL processing engine. When you capture bias, darks and flats in Maxim the program carefully annotates all the files with various meta-data about exposure time, filters used and so on. It then automatically groups sets of frames that have matching meta-data together into "calibration groups". Then, when you come back with a set of light frames, Maxim will look at the meta-data on those frames and automatically find the closest matching calibration groups to use to calibrate the lights.
The result is that all you need to do for calibration is:
1. Set up your telescope.
2. Do a run to capture all the calibration frames.
3. Put all the frames in one place on your computer.
4. Point Maxim at that place and make a calibration group.
Then when you take a new set of pictures you just tell Maxim to calibrate all of them using the appropriate calibration group, and it just happens.
You can read about all the details here.
The only thing I have not tried is to see what happens when you have multiple groups that match on the basic image meta-data (temperature, filter, etc) but differ only in the date on which they were taken. This will happen since you need to periodically update the calibration frames since the performance of the CCD will drift, or you might change your telescope and need new flats. But, you want also want to keep the old calibration frames in case you want to re-process old pictures. It would be truly magic if Maxim also kept track of this for you. But nothing in the docs say that this is so.
Anyway, with the calibration engine in place, the basic workflow with Maxim boils down to this:
1. Set up your camera parameters. You only need to do this once.
2. Set up standard "sequence" of frames that you will normally use. For example I have one that is 10 luminance frames (no filter) and then 5 each in R, G and B with a standard exposure time of 5 minutes per frame.
3. Shoot a set of calibration frames for each of the standard temperature and time settings you use. Store these away.
Then to capture pictures:
1. Set up your telescope and camera using whatever scheme you like.
2. Focus. (Focus is actually it's own set of problems, since focus drifts over time as the telescope changes temperature. This is a tedious pain in the ass, but the subject of another article). I use a Bahtinov Mask for this.
3. Point the telescope at the object you want to capture. Use the plate solver to center center the object where you want in the frame.
4. Find a guide star and calibrate the guider on it. This is the subject of a large amount of angst which I will not get into now.
5. Run the exposure sequence.
If all goes well you'll end up with 25 light frames and a set of calibration frames that you can use for the first steps in processing the image.
Next time, things that will go wrong and what to do about them. And, what to do with those 25 light frames once you have them in your pocket.